Sketch Gallery
Sketch Gallery
Before any of my work comes into fruition,
This gallery will be where I place all my sketches, including scrapped and updated ones. This section will get updated throught the weeks.


Greybox Captures
Greyboxing is a method that's used to build the layout of the map before adding details like props, lighting and textures. The name comes from the grey boxes that make the map, obviously. Whenever I'm happy with what's been made in the levels, I apply the props, textures and lighting to the level and either replace the blocks with fully textured walls or payer the textures over them.
This section is similar to the Sketch gallery and both are just image dumps to show my work. Whenever there's something that needs thorough explaining, I snag an image from the gallery and break it down.


Button Level (Logic)
I'd might as well go in detail about this level. This button level is one of the mandatory parts of the criteria that I need to tick off. Essentially, this level is a puzzle in which the player needs to activate 4 buttons in the right order.
The sketch on the right shows in red arrows and numbers what order these numbers go in. The sketch has been reviewed and approved so I'll go through this one with no changes.


.png)
Following that, I've made myself a flowchart on the left in which I'd use whenever I get around to coding in the buttons to work.
Below is the graybox of the button map copied from the sketch. For now, I'm using placeholder buttons in the appearance of stone cubes that have been flattened. These will be replaced with my own model of the buttons made in Autodesk Maya and textured in Substance painter, or take an asset as a last resort if there's no progress with the models.
After a few weeks, the models for the lights and speakers have been made and implemented to the game. The red part of the button is completely separated to allow free movement while the light has a translucent light to shine through.

.png)
.png)
This clutter of images is the blueprint overseeing the whole button puzzle in it's entirety. To summarise this, the buttons are triggered by player collisions and play their animations instantly. They turn on a Boolean (True/False variable) to mark the button pressed. The rest of the buttons are programmed so that if the button before it is pressed, it continues. If not, then a reset is triggered.
In addition, I wanted to add a light trigger so that whenever the right button is pressed, the light connected to the button triggers from white to green. Vice versa with the red lights when the player pressed the red button. However, I wasn't able to get this node working, so I'll have to continue after the portfolio submission during the other assignment.
.png)
The completion of this puzzle will trigger 2 animation: one for the camera and the other for the opening doors. The reason for this is due to the cinematic with both obstacles either ending with the camera getting stuck when pausing the cinematic to leave the open doors, or cutting back to the doors being closed when leaving the camera. I split the animation into 2 with the doors pausing at the end, rather than the camera.
.png)
This part of the blueprint is a custom function that's used in the rest of the code. The purpose of this is that it plays the button presses backwards and switches all booleans to False. Then entering the main event graph, I'm able to spawn in this function as a node and use it to start the button process all over again.
Platform Level (Spatial)

.png)
For this level, the player would need to cross moving platforms to reach the other side of the map. If the player does fall, there are stairs to help them get back on top of the platform and start again.
The level has been reviewed and I was told that this level seemed too short and exploitable. The platforms are too close to eachother and can be jumped over when landing right.
As I recieved the critique, I got to work on the new redesign with a sketch and a brand new greybox.
This next sketch goes into a little more complex territory with more space, more platforms and more forms of them moving around. There are platforms that move vertically in an irregular fashion that would be a bit of a challenge, and the last 2 platforms go round a circle The bigger space allows me to make sure something like leaping over more than one platform doesn't occur.
Below, the greybox shows the platforms in their same position as the ones in the sketch. The map has been stretched out to give off more space.
.png)

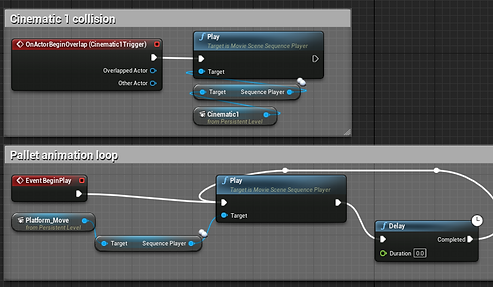
When my pallet models were complete, I replaced the flat white platforms with the pallets and began animating each one of them to loop the same movements. Below, is a blueprint of the cinematic that plays on player collision with the collision box, as well as my methods of looping the pallet animation.
In addition, there is a video of the overhead view of the animation during its greybox stages.
Maze Level (Spatial)

The maze was another spacial level that I wanted to get around doing. Despite the criteria of the assinment being a minimum of 2 levels (1 Spatial and 1 Logical) I wanted to push on with 2 spatial levels since this one was quite easy to do. My intention was to make the mze out of the barrels or boxes model from the Abandonned Factory asset pack.
Before getting to work on making the greybox, I had the maze reviewed before having to tediously copy+paste tens of barrels. I was suggested to make the maze bigger and more complex. And so I did just that. I used a website that randomly generates a maze for me with the completion path. I kept refreshing the maze until I got the design I wanted. Almost. Some changes will be made to a couple paths.

.png)

The maze has been dragged into Unreal Engine and used as a layout of where the barrels will be placed. I placed the walls and the barrels in where they need to be. Once I got that sorted, I copy and pasted them twice to form a taller wall to obstruct the exit and to avoid having the player jump over the barrels.
Props
The minimal count of props I needed to make was 3, but I ended up making 4. I'll go through each one and explain the process in Maya and Substance Painter, and their uses in-game.
Speakers
.png)
.png)
.png)
The speakers were meant to broadcast the sounds of the music and potential dialogue of a character and were to be spread out accross the levels to play sounds. It's a way to add background noise. What song I go for would probably be a classical song played on the piano, potentially one that's public domain to avoid copyright issues.
.png)
The speakers were done in Maya with a simple cube. It's been bevelled, edited in UV similar to an unfolded cube and had the back of it's polygons taken out to save data. Also the fact that the back of it isn't visible anyways. The model is also smoothed out slightly.
In Substance Painter, I relied heavily on using Normal mapping to push down a few holes into the textures. I used stamping and a preset stamp made of spots to make 4 circular markings.
.png)
.png)
.png)

.png)
.png)
Lights
The light is only meant for one level, and that's the button level. These lights have a translucent surface where I can place a light inside while having a protective metal cage around the light to block it from damage.
In Maya, the model is made out of a cylinder and donut primatives and they've all been smoothed out slightly to avoid sharper edges. The cylinder was extruded and had 2 textures on it: one with the metal bottom and the top being the glass. The donuts were reshaped to form a barrier arround the light and were split in half when doing the vertical ones.
In Substance Painter, I worked around with the opacity of the ligtht to create a translucent and shiny material. The metal on the other hand is just a black painted metal with a few scratches around it.
Button
The button's purpose is obsiously to act as an interactable button for the player to step on. This is used for a Logic puzzle that involves opening a door that the player needs to progress to. The red and black parts are separate to allow a more natural button press. Like the rest of the models, I used a smooth tool to avoid sharper edges.
In Substance painter, I dragged a shiny surface onto the red part of the prop and a rough, grainy texture on the black surface. The Normal mapping was used to make a pattern on top of the button.
.png)

.png)
.png)
.png)
Pallet
The pallet's purpose is to act as the platforms for the Spatial puzzle. They are to be made to wood and of the same variety. The model was done by copy+pasting the same UV rigged plank into a new position. About 10 pastes were done. 8 more pastes were done for the blocks of wood in the 3rd layer of wood. They act as slightly formed cubes so there wasn't a big need for manipulating the UV. No need to use a smooth tool on these models since I've never seen a pallet with smooth edges.

.png)
Like all other assets, the textures were made in Substance painter, and so I used a wood prefab and dragged it into the UV. Compared to the rest of the assets, this one was the easiest since all it needed was one texture and nothing more.
.png)
.png)
The Graphical touches
With the asset pack recieved, I had enough textures, meshes and materials to decorate my map to a higher standard than flat grey boxes. Below is a compilation of what's been done to the once grayboxed areas with the asset packs and my own assets applied.


The way I went about texturing my work is by making new materials and use a red node called Texture Coordinate which allows the material to tile the pre-existing texture for bigger walls. As you can see, the assets only have the base colour and normal mapping so any balance of roughness or metalness wasn't existent.

Menu
.png)
.png)
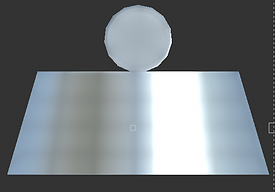
The menu was created so that there would be a beginning and end to my levels, instead of a continous loop and purgatory. The menu contains settings with 2 types of resolution options, a quit button that closes the program and the start button that takes the player to the level. The background was done in Autodesk Maya using Arnold renderer and a few textures from other modules due to a lack of compatibility with Unreal assets.
.png)
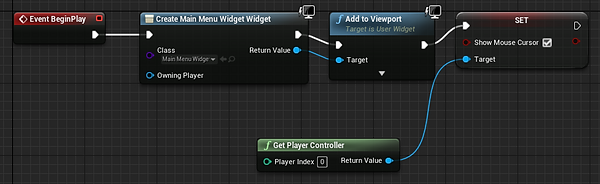
The blueprint above is what starts the display of the menu. It creates the layout I've created with buttons and text, and places it on the screen, fitting with the current resolution. The computer mouse is usable in this scenario.
.png)
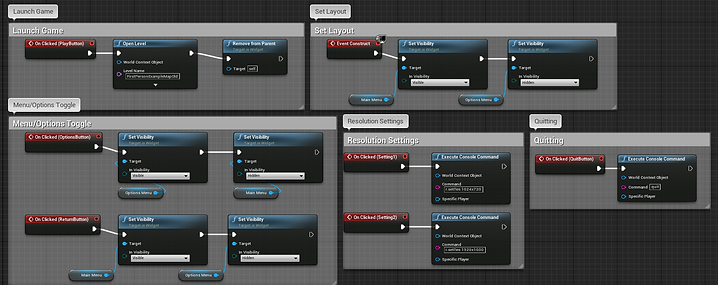
The next blueprint is what programmed the buttons to perform their functions. Launching the game with the main menu first, toggling from options to main, resolution settings in effect, play button launching a new map and the quit button doing what it says on the button.
Gameplay
With all things done and dusted, I present below a video of a full playthrough of my gameand levels. Some of the stuff like the button lights not working or the shoddy hitboxes are still an issue, but things may change in the next assignment as I submit the final project.