Assignment 1: Making the Mech
For the first assignment, I have to create the rig for a mech. A mech is a mix of human and machine, mostly leaning to either it being armour or prostheitcs. My mech that I'll be designing will mostly be leaning on the armour side of things.
Concept
The task is to make a mech with hints that there is a human behind the machinery so I wanted to go for a more modern design where it's a suit of armour with exposed areas that show the character's human body.
My concept borrows from 3 designs being the 1987 model of Robocop, the 2006 Cybermen and the 1974 K1 Robot from Doctor Who. Robocop for the roundness and colour pallete, The cybermen for the concept and the cylindrical shaped armour and the K1 robot, despite not being a mech, I wanted to match it's bulkyness as a nod to cheesy 70s sci-fi shows.
Additionally, I wanted to make the character's faces show with a detatchable mask, witch is something that Robocop does in the movies, but not forcefully removed in fights or maintenance. I would make it so it opens like a window or a motorcycle helmet.
Also, using my older concepts from last year and this year, I'll take my Knight concept and integrate it into the assignment.


Links to reference images I used.
Character Sumary (So if you're not interested, feel free to skip)
The Knight armour was made in 1989 as a counter to riots and gangs that have began spreading in London due to events that would take all day to explain. It was worn by officers and was planned to be used in war. In 1992 after the country locked down from the world and it's neighbours, the Knights were turned into cyborgs that ran on a black blood that preserved their bodies like pickled gherkins, which is also the reason for their black veins. Their goal is to convert all British citizens into becoming like them.
(Summary ends here)
I've began sketching the concept for the mech. I've done a rough sketch, then went to individual parts of the body and go into detail.


ZBrush
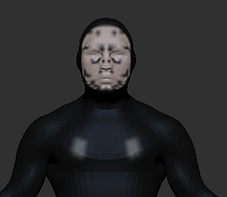
I started by importing a human model template from Maya to ZBrush. The template I used was a Demo Soldier and I've removed all it's clothes, smoothed out the details I didn't need and painted the character to make him what I wanted him to be. That being a man in a black skinsuit. The black lines on the face are the veins, but that's not important to note here.
When I was happy with what I've painted, I began a similar process with my Villain scupture: I cloned the model and made a low poly version with subdivisions built in. So when I render it in Maya, I set it so that it renders it more smoother in Arnold. Not only that, it's important in the later step where I need to use the Paint Skin Weight Tool to paint what polygons move with what joint. And the less of them, the easier it'd be.
When I've prepared the model, there wasn't a need to stay in ZBrush, so I've moved onto Maya.
.png)
.png)
.png)
1. Original without clothes.
2. Fully painted.
3. Making it low poly.
Maya Rig and Render
.png)
Maya has a built-in feature named HumanIK which allows the user to make a human shaped rig and bind it to their models. It also comes with the ability to make IK handles and other parts to help with moving around the character and such.
I've done this process before with a skeleton so I'll go into more detail in an Extras side while I make it quick and vague on what I did here: I've added the character to Geometry, created guides to move the joints around, connect the joints together and then bind the skeleton to the model.
I've had it set so I get IK handles automatically, and it worked fine, apart from the right leg that rotates on it's own when moving.
.png)

Then I get to the worst part in my opinion: the Paint Skin Weight tool. This tool allows me to paint whichever polygons I want to be attatched to a certain joint.
The images on the sides is the progress I've done on the shoulders and as reference to where I need to paint for the other shoulder. I had to zoom into the model since I couldn't get the whole armpit.
The issue is that the Paint Skin Weight tends to latch onto polygons that have no business to be attatched to. For example, I've had instances that the foot had polygons stuck to the neck or the shoulder pulling a thigh up. The reason it kept happening was due to me erasing some joints and then attatching to random joints, or it's when I smooth out the edges of a limb.
For the assignment, I was to make 5 Dynamic poses with the current rig that I've made. So I've assembled 5 poses like sitting, running and doing bendy moves to be as dynamic as possible.


And this is the part where I've realized that I forgot to add mech parts and submitted the work without anything hooked on the character. Oh, Crumpets with Cheese!
Assignment 1 Addendum
For this section, I'm planning on correcting myself and continue my work on the model. Once I've polished the rig, I'm going to try again with the 5 dynamic poses, but this time make them outside of the assignment. I don't care about what marks I get for Assignment 1, I'll take a fail for this one time. I want to make this one right.
As I'm writing this, I've modelled the parts for the model out of primitive cubes and cylinders and extruding them till I get the shape I want. For some parts like the shoulder, knee and fingers, I've modelled them using Quad Draw to draw new polygons around the body. I then attatch these parts to the joints and delete the inside of the mech to reduce the number of polygons that won't be seen anyways. Also, for clipping reasons.
The helmet was split into 2 parts so I can animate it to open and show the character's face. The movable hemlet is parented to a cylinder that's parented to the part of the helmet that will later be parented to the head joint. Once that's done, I will rotate the cylinder upwards and downwards when the character makes a move on their helmet.


Once I've added all my pieces of tech to the character, I've then applied the textures to the models. The new models were mostly recieving blank textures for now, with having grey-matte metal with black details to the sides of the armour. Thte light bulbs and the visor on the mech have a translucent texture on them and the vent and light on the chestpiece have been textured from Adobe Substance (Short note: Adobe bought Substance Painter)
It was a lot easier to paint with the Paint Skin Weight tool with less polygons on the human part, but I was then told to change the rig so that it's only the rig and no IK Handles and these red circles for selecting the shoulders and thighs. A lot of that stuff will be in the mocap anyways.
But for now, I'll use this model to redo all my images with the full mech. A lot of them were posed differently to make up for the bulky appearance.


Assignment 2: Mocap, Rig and Render
This is the start of the Second Assignment where I begin to apply the Mocap to the model.
Mocap
The mocap was done in a studio in my Uni with Lorena being the one wearing the mocap suit. How it worked was by having her wear a velcro skin-tight suit and have reflective plastic balls covering her body. The picture to the side was taken with flash photography to show how reflective they were to cameras. There were then about 8 or 9 cameras that have been placed around the studio to track the reflective parts of the suit.
The reflective balls were then placed as markers in the program and a joint skeleton was created. We were then able to make our animations. After doing a few of her own, I've asked Lorena what my animation was: I wanted her to flip her helmet open like opening the visor part of a motorcycle helmet with her palm out. Next to check her right wrist like a watch, and then her right wrist. Then flick the hand down and then upwards, close the helmet and go back to A-Pose. I've shown her the moves with me doing the same thing I mentioned above. There were 2 takes since there was limited time and there was 4 rigs that needed to be done. I went with the second for being faster and sharper.

Import

With the rig given to me, I ported the mocap to the model I've been working on. I did that by first setting up the mocap's skeleton as a new Character Definition. I did this by first deleting any irrelevant fluff that wasn't needed for the mocap, made a single frame where I set all joints to 0 to stretch them out into a T-Pose and then assign each joint as a shoulder, spine, leg and head. The reason for stretching out the model was to make it easier for the Human IK to mirror itself and do the same thing to the other side of the arm and legs.
Once I've assigned the mocap to the Character Definition, I've selected my Mech Rig and set the Source to the Mocap. So whatever animation's done on the limbs will be replicated to the Mech.
And this is how the animation played out.
Now, the issue already is the legs of the characters and how they've been twisted sideways like my mech fell down the stairs like an ED-209 from Robocop and that the posture is too relaxed for what's meant to be a soldier. There's also clipping on the belly and the hands going through the armour.
Now there's 3 ways this happened: The body type is different and doesn't translate well, the balls on the mocap suit were not placed well or something was wonky on my end. No matter what it is, I had to fix the animations. One would redo the rig or mocap all over again, but I chose not to. I wanted to fix it by my hands.
Fixing

Left_Arm Joint before (Above) and after (Below)

Opening the Animation Editor takes me to these graphs showing all the keyframes of the Left_Arm as an example. These pictures show the rotation values for X, Y and Z. What I've done was move them around by selecting them and when holding Shift, I can move them up or down without worrying about my keyframes going sideways.
The changes on these joints go from minimal by moving the joints slightly to deleting ones that stick out and make a glitchy twitch when played.
A lot of the ones like the legs have been redone due to how broken the legs were anyways and the head was exaggerated to turn more in certain directions to look directly at the weapons and the shield.
There have been flicks of the body done to enhance the extreme motion of the character's hands.
More Gear
In addition to the helmet being animated, I've also made 2 additional items for the Knight to use.
The arm gun was modelled to have an inside, but that's all it has. It's a static prop for the character to look at, rather than having the Knight look at nothing.
The shield is the more complex compared to the helmet and gun. This one is a retractable shield that's concealed in a metal square. When flicked, the shield opens up and closes back in when flicked again. In a separate scene, i've modelled the shield parts to have Limited Information that prevents the shield from clipping to the sides when moved. When placed on the Knight, the shield was too small, so I tweaked the Scale limit so that it stretches further to be more useful.

Bridge Scenery
Using Bridge, I've ported in models and textures to make my environment. That being an old white building with trash littered on the floors. I've modelled the inside of the building using planes and the textures from bridge as well, ranging from tiles and bricks found in fancy banks. The windows share the same textures as the Mech's visor and being dark. I've had a messier environemnt with bin bags littered everywhere, but with plugin problems at home and losing said scene with the bin bags, it would take too long to re-import the models and textures and time was grtowing short. Also, the dome around the scene was of a normal sun like in the Addendum for Assignment 1.


On a side note, I've added short animations to 2 props of an apple core falling off the stairs behind the mech and a paint can rolling down the streets. This is to add some livelyness to the environment and make it less like a static set.


I've had 3 cameras on the the mech to get 3 different perspectives looking at the animation. One's a static camera, the second being a first person perspective of the mech and the third showing someone peeking at the mech.
I've decided to render only the static camera first since the second doesn't show the mocap and the third was too far to show the animation. As much as I like to render all 3 and see what it looks like, the first render took 18 hours or longer when the computer went to sleep overnight. But I do have playblasts of 3 camera shots.
Playblast and Renders
The first Arnold render has been completed, however, there was 2 frames that didn't finish rendering and I didn't want to wait another 10 minutes just to fix 2 frames out of 250 or more.
But alas, here's the animation in its full glory.
Extra 1: Quad Draw
Quad Draw is a tool in Autodesk Maya that has you create polygons by mapping out indexes and using them as references to make quad polygons
Our task was to draw on a face and make a Venetian Mask out of our Quad draw.
I've made a Plane and placed a texture of half of my face on it. I then clicked on the magnet Icon that made my face live and highlight the plane in dark green. For QUad Draw, this would makes the Indexes snap onto the live model, making it easy to make something like an armour that's fits to the character's body.
I've began by drawing around the eye and mouth, with a line going down the forehead and nose. What's important is that I build these polygons so that when I add an edge loop by holding Ctrl, the line goes around the polygons and adds an edge to all polygons. I have to always make sure that the polygons that I'm making are able to be Edge looped in the form of a circle (Eye), arc (Mouth) or a straight line (Everything else).


There are plenty of useful shortcuts other than Ctrl and Click: Holding Shift and holding the mouse button on the polygons lets me smooth out the Indexes, you can drag an index with another to merge them and Ctrl + Shift to delete components that you think aren't needed.
I kept adding more polygons and edge loops, extruding in some places and then smoothed out some areas until I've filled the face with blue shapes to form a face.
What had to be done next was to move the shapes up to form a face. With the help of the Soft Select tool, I made it look natural in some places. What was left was to smooth it out, edit the smoothed out parts out like the nose being too thin and then mirror it by using Duplicate Special and setting the X co-ordinates to -1 when duplicating.


Extra 2: Basic Mocap Rig
For this, I'm going to go through the process of setting up a rig, the mocap and then merging the 2 together to make it work.


Out of the 2 models, I chose the Troll model to rig.
Opening the HumanIK rig, I have to choose the Quick Rig tool and I'm taken to the menu where I can either set everything automatically from the get-go, or do it step-by-step. Obviously, I'd do it step-by-step.
Start: I click the + button to add a new character and rename it to "Troll"
1) Geometry: I select the troll model and add it to Geometry which will be used as reference and the skin for the last step.
2) Guides: I select Geometry Soup so that the guides are created around the geometry. They form a human rig.
3) I adjusst the guides manually so they fit the character model more.
4) Skeleton and Rig Generator: Since this is a mocap, I change it to Skeleton Only and leave out the Controls. they connect the guides to make a joint skeleton.
5) Skinning: This applies the skin, which is the troll model that I've assigned into the geometry.
With that done, I've ported the mocap in and began setting that up.


For Model
For Mocap

When porting the mocap into the scene, I first make a new keyframe where the model is streteched out to a full T-Pose by selecting the heirarchy and setting all rotations to 0. Then I select Create Control Rig on the HumanIK page and begin assigning the joints to the Definition shown on the left. The reason for the T-Pose keyframe is so that it's easier to recognise the model symetrically and to save time, it mirrors the other limbs.
Once that was done, I've went back to my Troll Rig, assigned the Source to the Mocap animation, and now the mocap puppets the troll. THe playblast can be viewed below.
Extra 3: Mixer and Bridge
Mixer and Bridge are softwares made by Quixel: Mixel is for making photo-realistic materials by mixing and matching presets and other imported materials to make something unique. Bridge involves porting photo-realistic models to Maya, Unreal, Unity and more.
The puprpose of these programs is to create an environment that my mech will normally reside in or fit with its environment. I'll be making a basic environment for this whilst then making something more detailed later on.

In Mixer, I've made a concrete floor with rocks inside of the concrete. In addition, mud is mostly covering the concrete, making it look dirty. Finally, ending with a blood splatter glistening on the ground.
Exporting it is easy, putting the textures in a file of my choice.
Note: The Uni computers have been having issues with Mixer, therefore the only way I could make these at home.
For Bridge, I decided to go for an industrial environment, so rusty props, and decor should be fine.
Porting these props to Maya takes a lot more steps: You would have to download a plugin, set it to port to the program you want, select where to save the files and then export to an open Maya scene.
Note: At home, Bridge didn't work. The plugin never shows up on Maya, meaning that nothing can be ported directly. Bridge only worked on Uni computers.

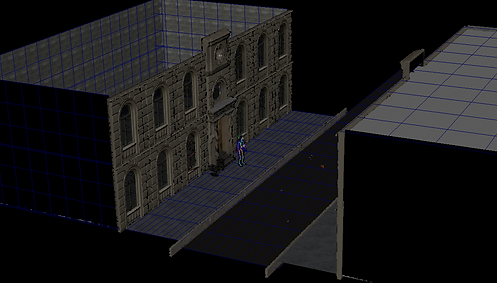
I've made a few Arnold Renders of the Bridge scene with a placeholder character to show how big the set is. These were done on a Uni computer. The same computer that couldn't run Mixer so I couldn't make the plane.


Our last task was to build cameras to pan and zoom around the set.
Simpley put, I've done the zoom camera by controlling the camera and moving it closer to the set and assigning it to the last keyframe.
For the rotating camera, I've had it pose on the left side of the set, moved the pivot to the middle of the plane and then rotated the camera so it keeps focus on the set while rotating.